Enable Your Custom Agent in Power Pages to Search Dynamics 365 Knowledge Articles
- bouhmidiasmaa
- Jul 7, 2025
- 3 min read
If you're using Power Pages and Dynamics 365, you can now make your custom chatbot even smarter by letting it search and share knowledge articles directly from your system. Whether it’s for helping customers find quick answers or guiding employees to the right info, this feature can save time and improve support.
In this post, I’ll show you how to connect your bot to your knowledge base so it can respond with useful articles—just like a real support agent would.
Let’s get started!
Configure Relevance Search for the Knowledge Article Table
To search in knowledge articles, relevance search must be enabled and properly configured in the environment. To do this, follow the steps below:
Enable Relevance Search in the Environment
Go to Power Platform Admin Center, Select your environment → Settings → Product → Features and Ensure Dataverse Search is turned ON(Formerly called Relevance Search)

Enable Relevance Search for the Knowledge Article Table
Go to Advanced Settings > Customizations > Customize the System. This will open the Default Solution - Microsoft Dynamics 365 window. Under Components, select Entities, then click Configure Dataverse Search to open the Select Entities dialog. In the Available Entities box, select Knowledge Article, click Add, and then select OK to confirm.


Adding Find Columns (Searchable Fields)
The Find Columns determine which fields are searched using Relevance Search, Go to your solution and Tables and select Knowledge Article. Under Views, find the Quick Find View. Inside this view, use Add Find Columns to include the fields you want to use for search filtering.

Activate the 'Search Dynamics 365 knowledge article flow'
The Power Automate flow used by the agent to search Knowledge Articles is already part of the environment, but we need to update the connection references before activating it. To do this, add the existing Power Automate flow Search Dynamics 365 Knowledge Article to your solution, along with the two connection references used by this flow.

Replace or create, if they do not already exist, the connections used in those connection references.

Once done, you can activate the Power Automate flow.
Create Your Agent
In Power Pages, navigate to your Website settings, then click on Setup followed by Add agent. Ensure that both options, Create agent and Enable agent on site, are turned on by setting them to Yes.

Configure your agent
Open Copilot Studio; you will find that your agent has been created and is ready to be set up.
Disable authentication
In my case, I want my agent to be used by external users without requiring them to sign in.
To do so, open your agent, click on Settings, then Security, and select No authentication.


This might create errors in some topics, such as Start Conversation or Conversational Boosting, so you will need to fix them before moving forward.
Create Topic
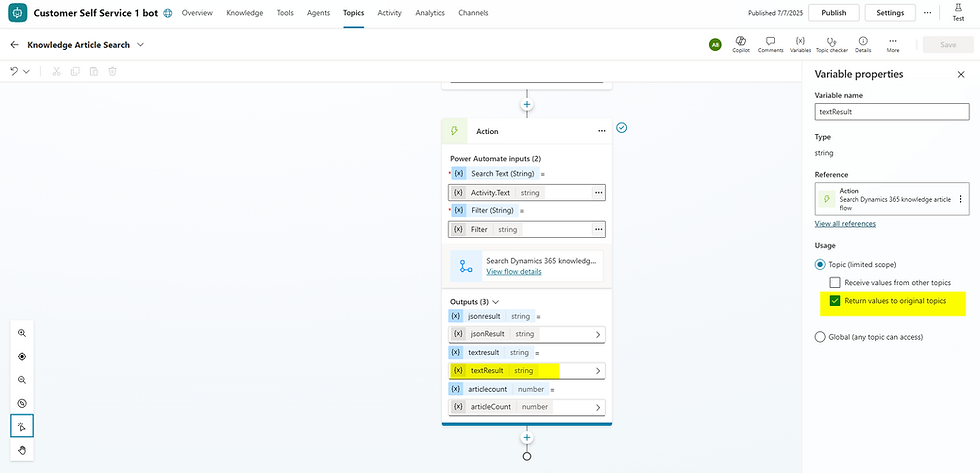
Next, we will create a new topic that will call our Power Automate flow to search Knowledge Articles and return the results to our agent. Inside this topic, add a variable with the following value: statecode eq 3 and isinternal eq false. This means that the Power Automate flow will search only for published articles that are not flagged as internal. Then, call the Power Automate flow we activated previously, passing the system variable activity.text as the search text and the variable we created as the filter.


Next, click on the Text Result variable and check "Return value to original topic".
Save the topic and you can now call it from any other topic. In this blog, we will call it from the Fallback topic, so that if the text entered by the user doesn't match any existing topics, the agent will search for a response in the Knowledge Articles.
Trigger Knowledge Search
Open the Fallback topic and add a step to call the Knowledge Article Search topic. Then, add a condition to check whether the textResult returned by this topic has a value—this means the agent has found a knowledge article to return to the end user. In this case, the message shown to the user will be the textResult. Otherwise, you can display a fallback message such as:
"Sorry, unable to process your question. Can you rephrase or ask another question?"


And there you have it! With just a few simple steps, you’ve taught your custom agent how to search through your Dynamics 365 Knowledge Articles—even when it doesn’t know exactly what the user is asking. By connecting this to the fallback topic, your bot becomes more helpful, less frustrating, and a lot more user-friendly.
It’s little improvements like this that make a big difference in the overall experience. So go ahead—test it out, tweak it as needed, and don’t be afraid to make it your own. 😊
Got questions or tips of your own? I’d love to hear from you!


Comments